Live Rocket Telemetry and Logging in Just Two Weeks
creating a logging and telemetry system for my L1 certification rocket
WORK IN PROGRESS
Check back soon for a finished post!
In two weeks–from conception to launch–I designed a rocket telemetry system that could display live data, aid in recovery, and log hundreds of thousands of data points. On March 14th, 2026, it launched!
The Prestige Inspiration
The two major U.S. rocket clubs–National Association of Rocketry and Tripoli– regulate the purchase of high powered motors through a certification system. Rice Eclipse rocketry has a division that helps people get their Level 1 Certifications.
Two weeks before my certification launch, I went to another Eclipse event–the launch of our Prestige rocket. This dual-stage rocket had a simulated apogee of 9,000’. I’ve been part of the team designing the avionics bay for Prestige, and it was amazing to see our gear in action. Specifically, the booster and sustainer had several pieces of electronics each–a flight computer, GPS tracker, altimeter, and so on.
I’ve long had an interest in NASA Mission Control. During the Prestige launch, I realized just how much this carried over to high powered rocketry. Seeing the telemetry systems come alive–and seeing the troubleshooting when they didn’t–was a highlight of the day.
There were several folks there who also had their certs launch on March 14th, so we started discussing ideas at the Prestige launch. I knew I wanted to do something interesting with mine, but I wasn’t yet sure what that would look like. My first thought was modeling it after a classic rocket like the Mercury-Redstone Launch Vehicle. Throughout the day, I kept thinking more about the tech side of things, and I realized that if I worked hard and got a bit lucky, I had just enough time to pull off a custom electronics system. There was intense time pressure, so I got to work quickly.
I’d like to thank Brandon Shin for his contributions to the codebase, debugging help, and overall help. I also want to give a shout-out to the Certification Leads Ilina Goyal and Lavinia Barker for supporting this project.
System Architecture
The first step was naturally making a list of goals for this flight computer. The most basic system would act as an altimeter, logging apogee. I knew I could go further than that, though. I also wanted to log this data over time and record GPS location/altitude, acceleration, and temperature. A μSD card makes sense for this quantity of information–in fact, my final .CSV file was ~15 MB. This wouldn’t fit on many MCU flash chips. The radio bandwidth was fairly low and updated at 1 Hz, but with an onboard uSD card, I expected to log at speeds around 20 Hz.
The grail to me was live data visualization on my laptop. For an L1 cert that doesn’t fly all that high, it’s certainly overkill. Still, getting such a system working would be great experience for when I eventually build my Level 2 Cert rocket. Also, it’s just plain cool!
Notably, this flight computer does not handle separation charges and has no way to physically interact with the world. After several passive flights, I’d be interested in implementing charge deployment–with a COTS backup, of course. The data my flight computer collects would be useful for running simulations to be sure the recovery system works safely.
Let’s make the goals clearer:
- Collect altitude and temperature data
- Collect GPS data
- Collect acceleration data
And:
- Log these data points to a black box onboard uSD card
- Send these data points to a laptop ground station
Let’s do it!

Hardware Choices
Here’s my bill of materials:
- Feather RP2040 Adalogger
Choosing a microcontroller was the biggest decision. The Adafruit Feather line is a modular system with easy expansion. I chose the RP2040 version for its low power consumption and the reliability of the built-in SPI uSD card slot. - Adafruit BMP390
The BMP390 is a classic choice, and I found one lying around the OEDK for free. Its performance is good, it’s lightweight and compact, and it supports SPI and I2C. The temperature sensor is built in. I used I2C for communication. - Adafruit LSM6DSOX + LIS3MDL
An IMU combo. While I only used the LSM6DSOX accelerometer, I plan to enable the LIS3MDL magnetometer in the future for full 9-degree tracking. This board also uses I2C. - NEO-6MV2 GPS
The Adafruit GPS is quite pricy, and I knew any UART GPS unit would work fine. This one from Amazon is as good as any, and I like that it has a micro-USB plug for configuration. The external antenna is also great. - Missile Works Screw Switch
Screw switches are common in high powered rocketry because they are extremely unlikely to have issues under heavy vibration and acceleration. Grateful for Wyatt Armstrong for letting me borrow one from Eclipse Flight Control. With my wiring, the flight computer is actually enabled when the screw switch is in the disconnected position–more on this later. - Adafruit RFM95W LoRa Transceiver
915 MHz radio was the obvious choice here. It’s a standard in COTS flight computers; the other standard is 435 MHz. This frequency requires a Ham radio license, and while I do have one, it’s easier to not worry about it. Also, a 435 MHz quarter-wave antenna is naturally about twice the length of a 915 MHz antenna, so I like the compactness of this choice. It uses SPI. - Adafruit Feather RP2040 with RFM95 LoRa
Used for the ground station. It features the same RFM95 radio as the rocket’s module, and having the radio built directly onto the MCU board is convenient. - N-Type 4-Hole Bulkhead and N-type to uFL Cable I planned to make a custom 915 MHz ground plane antenna, and these parts are what individual solid-code wires attach to. Similar bulkheads will work fine.
- 1000 mAh 3.7V LiPo I bought a generic unit off Amazon and it works fine. However, keep in mind the polarity–the JST connector on the battery was actually reversed from what the RP2040 Adalogger expects. It was a quick but crucial fix.
Making the Rocket
Obviously, I need to put this avionics system into a real rocket. And hey–wasn’t the original goal just getting my L1 Cert? Let’s talk about it. Aside from the avionics bay, my rocket is standard fare, so this section will be quick.
The first step was deciding the rocket’s basic specifications. I immediately knew I wanted the space that two body tubes would provide. A body diameter of 2.6” provides enough space without lowering the apogee. I modeled it in OpenRocket and realized stability would be a challenge–not because it would be unstable, but because it’d be overstable. The stability margin depends on the center of gravity, the center of pressure, and the rocket’s diameter. Ideally, the stability margin should be between ~1.3 and ~2, and a rocket with a stability margin over ~2.3 is considered overstable. My initial model had a stability margin of ~2.7.
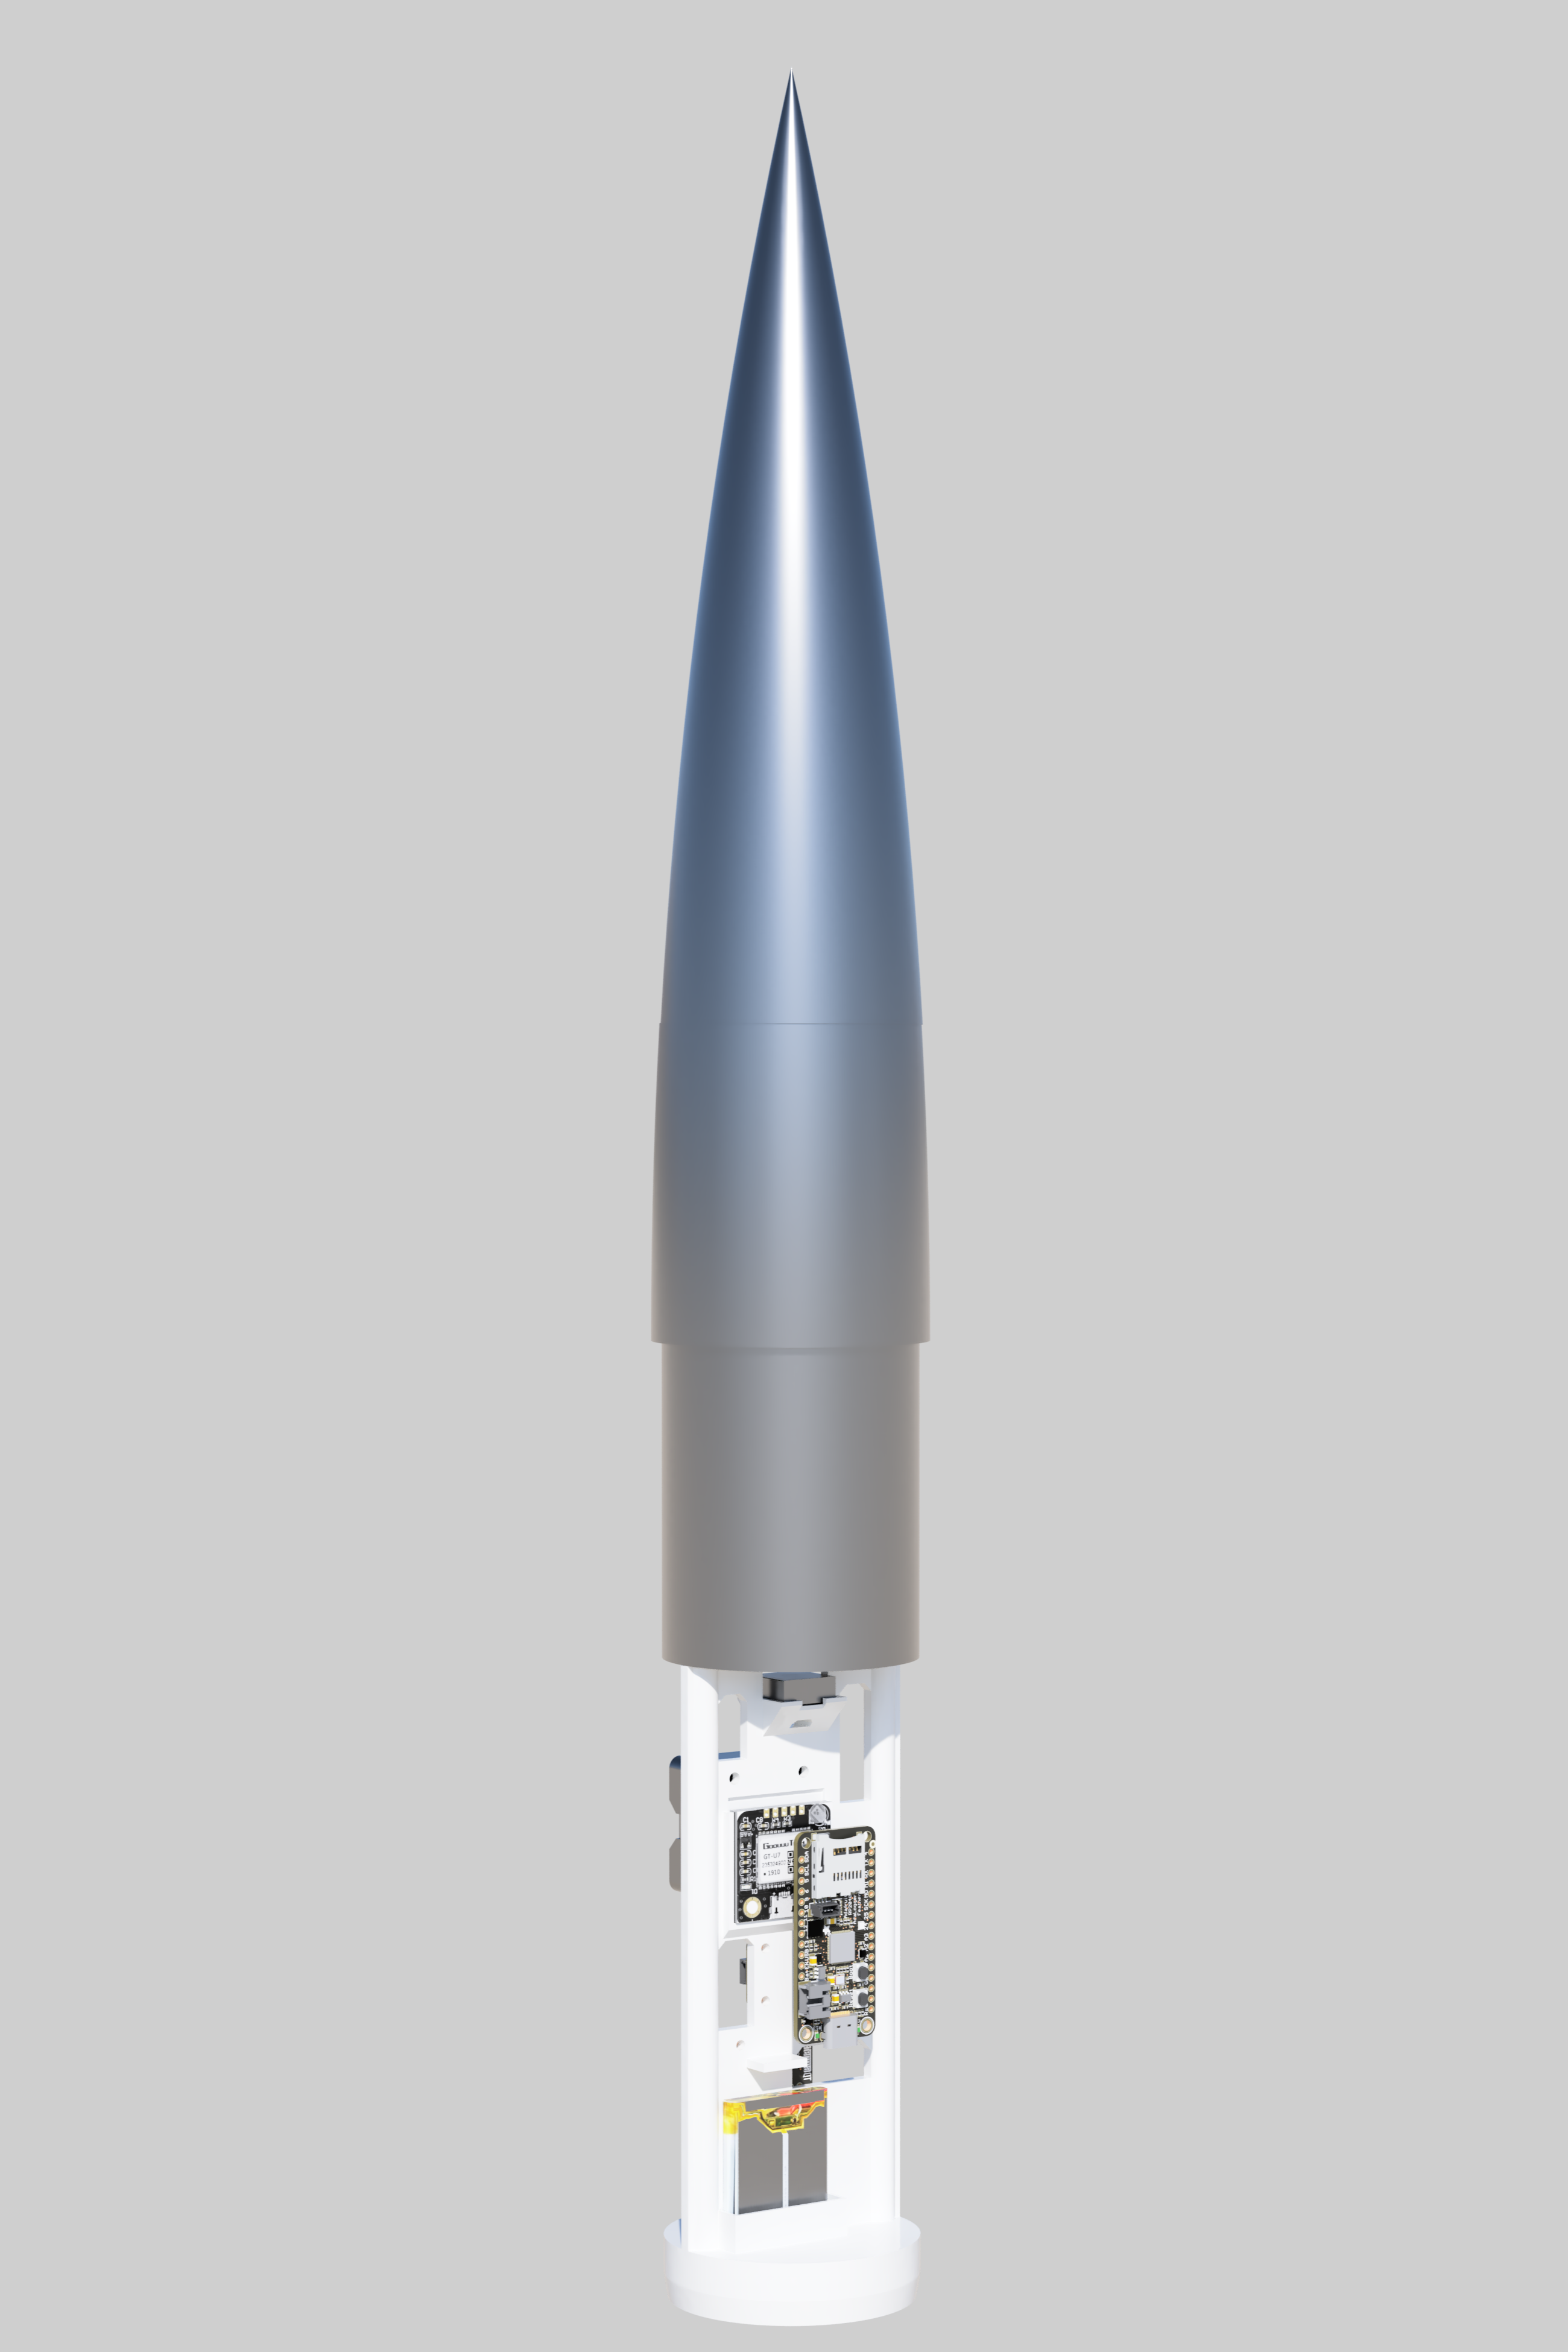
Overstability increases the rocket’s predisposition to weathercocking–pitching into the wind. My rocket model was overstable because the flight computer put so much mass toward the nose of the rocket. The solution? Make the rocket as short as possible. Instead of using a typical coupler, I realized I’d need to create a system that combines the nose cone, upper body tube, and coupler into one solid unit. Yep, in the below model, the mass component is clipping into the coupler–that’s the design!


You can find the OpenRocket model here. The rest of the design was simpler. The body tubes are heavy-duty cardboard, and the fins are laser-cut plywood. The nosecone is 3D-printed PLA. The rest is lots of epoxy, haha.


CAD & Assembly
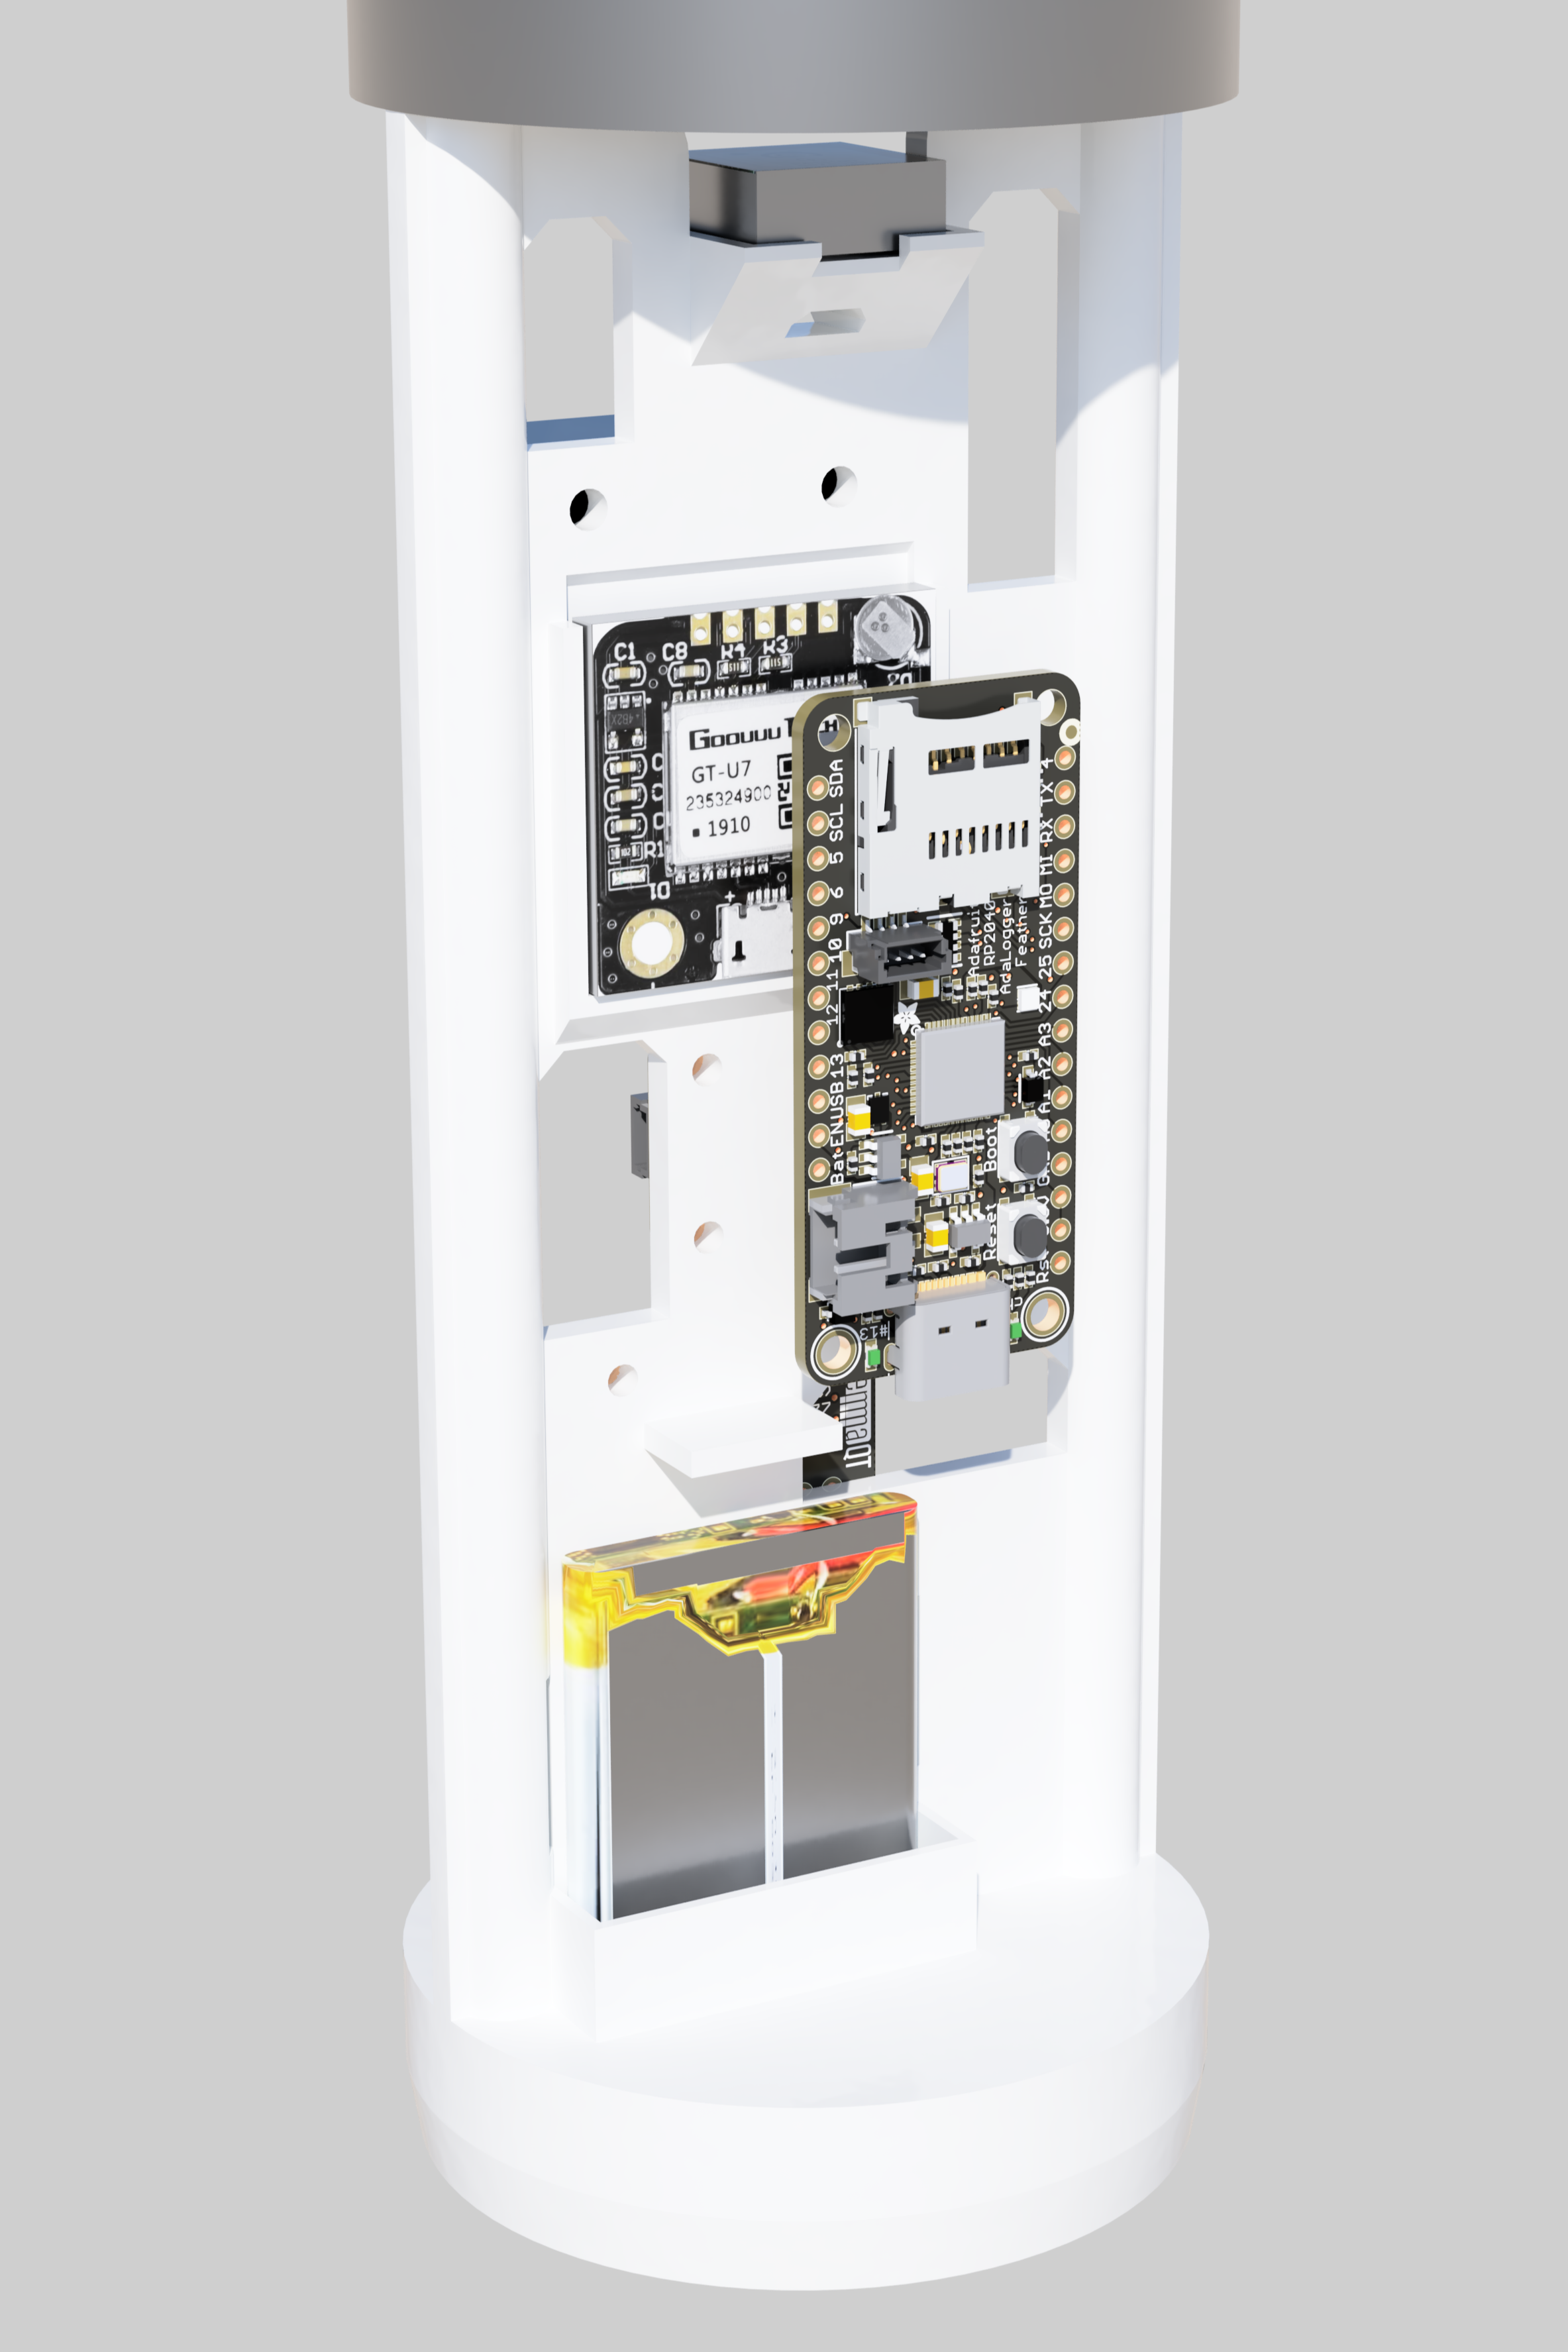
I wanted to get a sense of space in the real world before I dove into any CAD. Because I had just two weeks and the boards hadn’t arrived yet, I used the next best thing–cardboard!I cut each piece to its actual size and assembled them on a “sled.” This first design had surprising longevity.


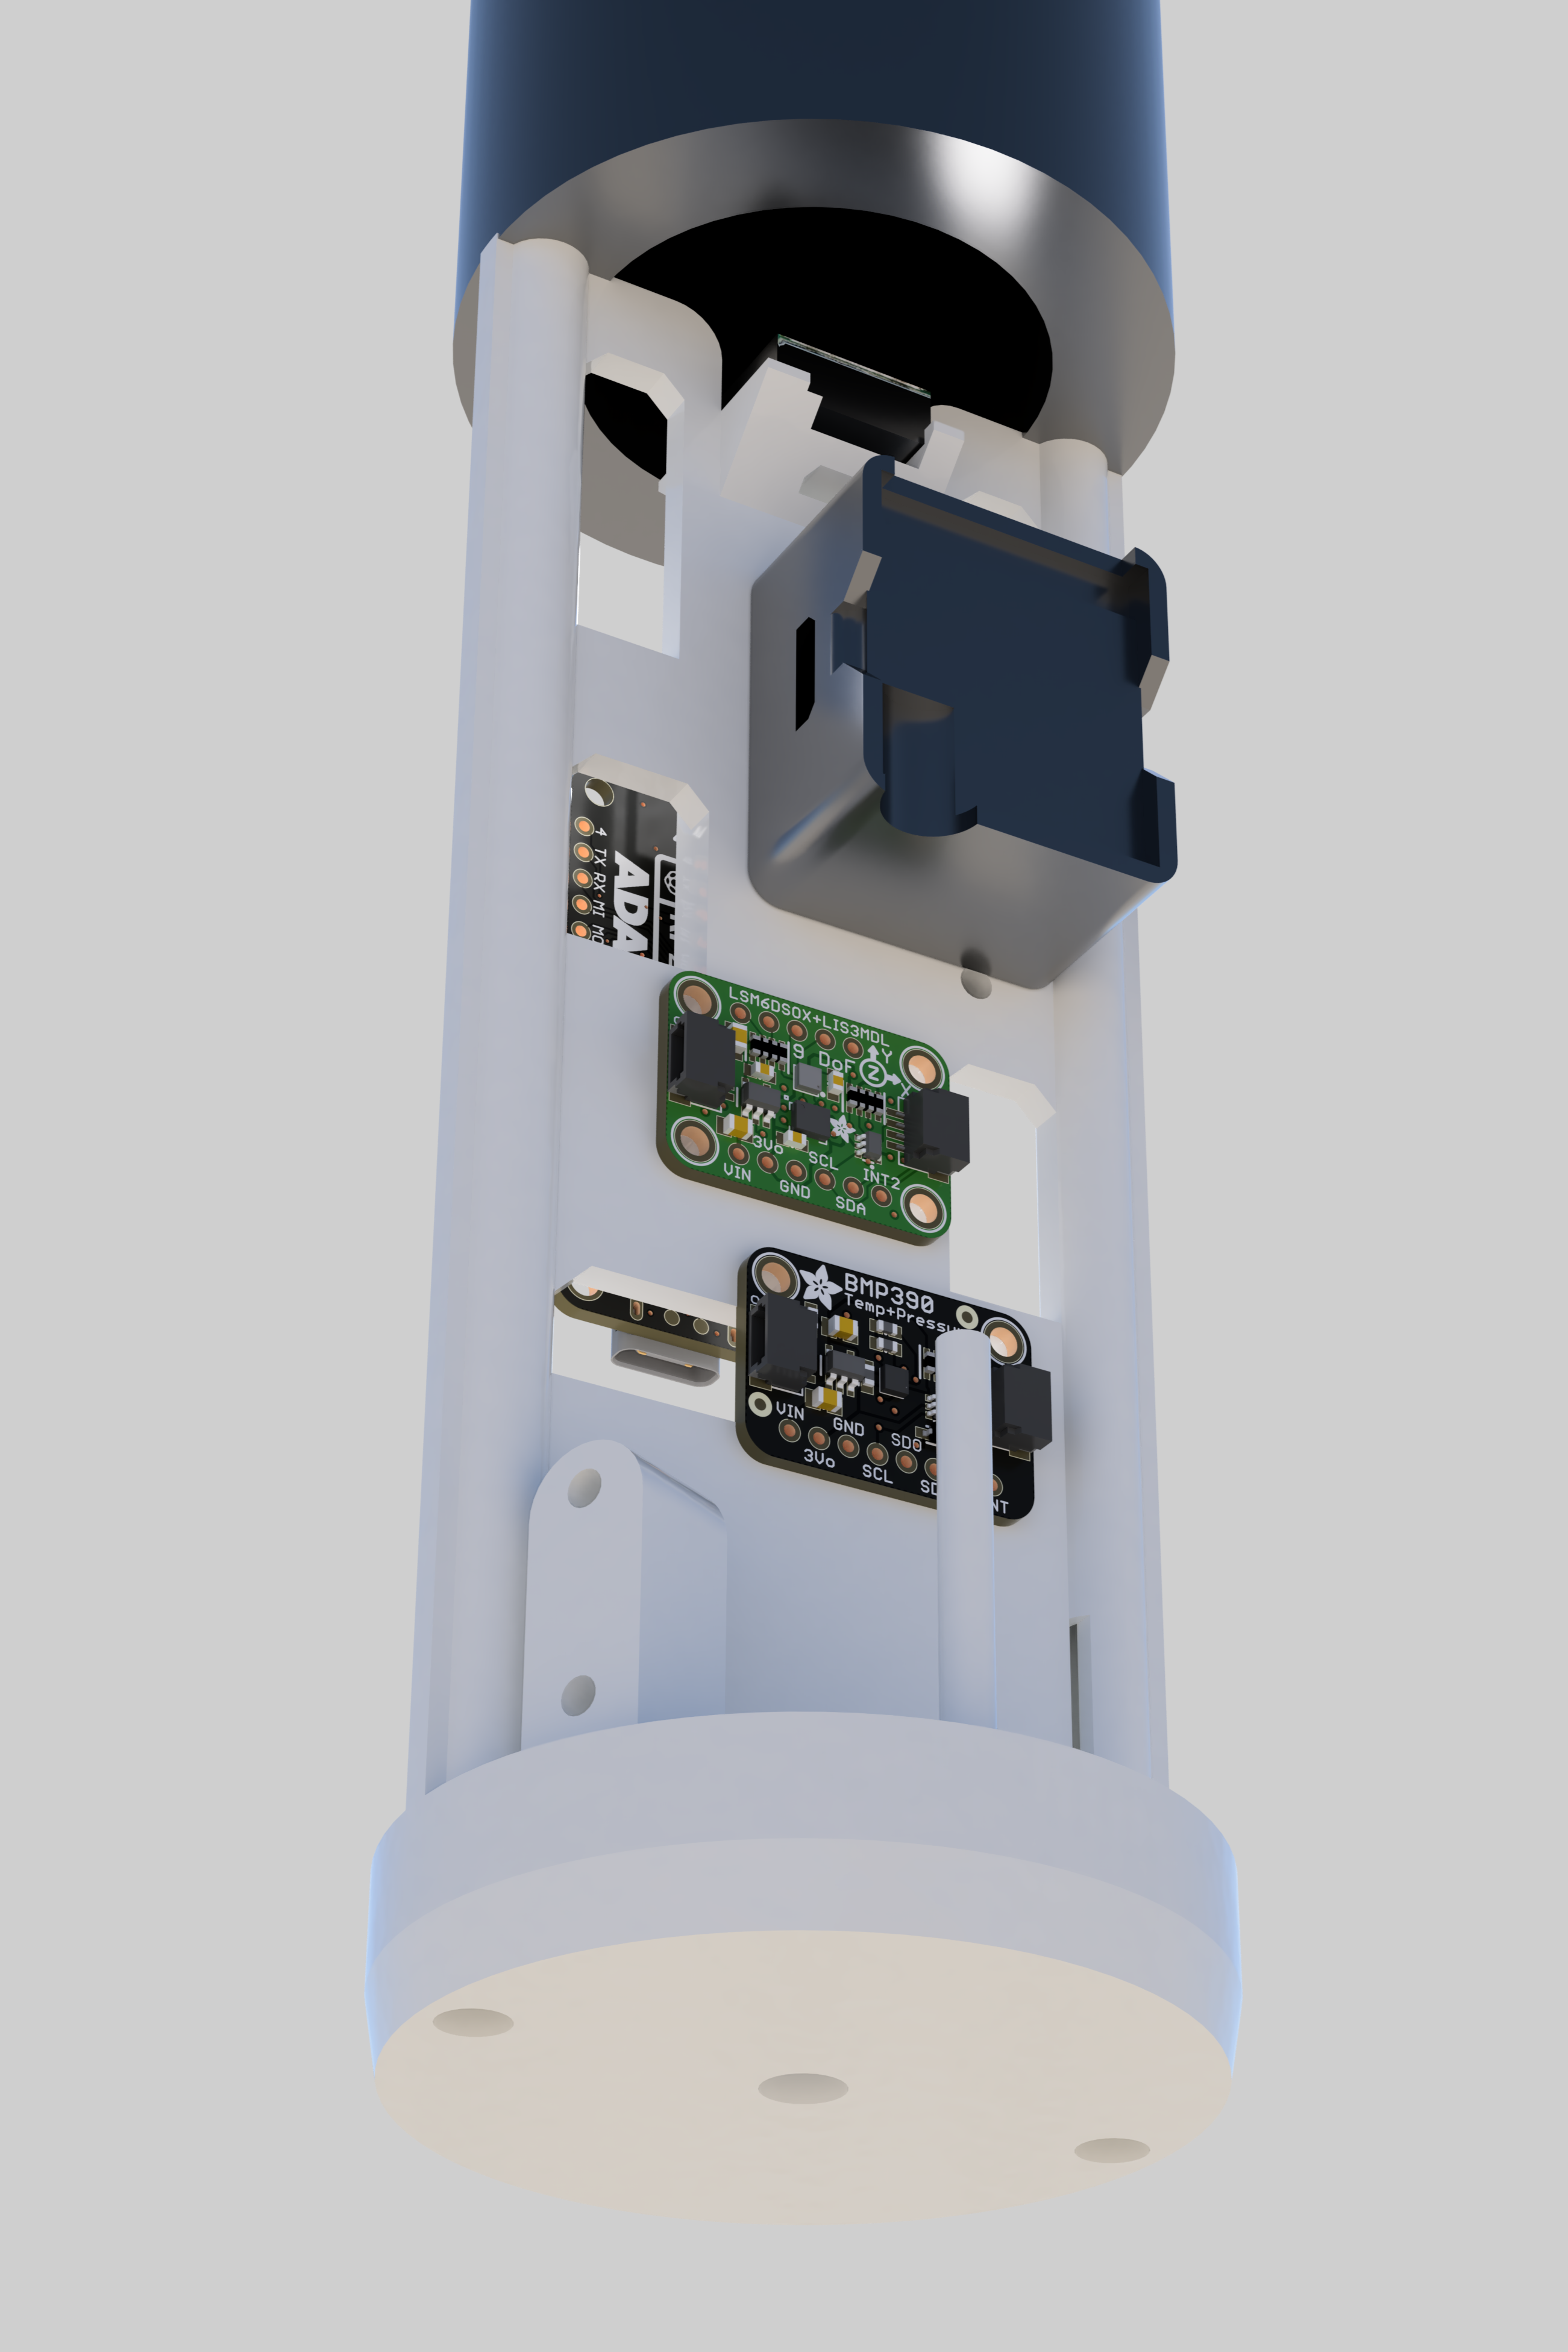
After that first design, I did some actual CAD. Big thanks to Ian Hsieh for helping out. In terms of component placement, I knew the GPS antenna would need to be away from noisy or RF-opaque materials. Similarly, the 915 MHz LoRa antenna needed to be away from the two M5 threaded rods to avoid shielding and unpredictable reflections. The accelerometer/magnetometer also needed to be away from large metal objects and high-current wires.


Because I needed a clean way to slide the avionics bay in and out of the upper body tube, I decided to make it slide onto threaded rods that are directly attached to the nose cone. Additionally, the top of the nose cone slides onto the base where it is epoxied in place.


You can see this in real life:

Finally, I put all the components in the model to ensure everything was the right size. The tight timeline impacted how pretty the renders are and my ability to include things like the LoRa antenna, the screw switch, etc. in the CAD.
Wiring
-1400.webp)
| Component | Sensor/Module Pin | Feather RP2040 Pin | Function / Protocol |
|---|---|---|---|
| BMP390 Barometer | VIN | 3V | Power (3.3V) |
| GND | GND | Ground | |
| SCL | SCL | I2C Clock | |
| SDA | SDA | I2C Data | |
| LSM6DSOX IMU | VIN | 3V | Power (3.3V) |
| GND | GND | Ground | |
| SCL | SCL | I2C Clock | |
| SDA | SDA | I2C Data | |
| NEO-6MV2 GPS | VCC | USB or 3V | Power |
| GND | GND | Ground | |
| TX | RX (GPIO 1) | UART Receive (Serial1) | |
| RX | TX (GPIO 0) | UART Transmit (Serial1) | |
| RFM95W LoRa | VIN | 3V | Power (3.3V) |
| GND | GND | Ground | |
| SCK | SCK | SPI Clock | |
| MISO | MI | SPI Master In | |
| MOSI | MO | SPI Master Out | |
| CS | 9 | SPI Chip Select | |
| RST | 10 | Hardware Reset | |
| G0 (IRQ) | 11 | Interrupt Request | |
| uSD Writer | CS | 23 | SPI Chip Select (Internal) |
| Screw Switch | Terminal 1 | EN | Enable Pin |
| Terminal 2 | GND | Pull to GND to disable |
I’ll walk through the assembly process First, I physically attached all the boards, working from the first layer to the last. Afterwards, I wired everything up, again from the bottom up.
Notice that the GPS antenna (tan plastic and metal) is at the very top to avoid shielding. The battery has its own section because it naturally doesn’t have any attachment points. The screw switch protrudes a bit, but there was enough space for everything to slide in and out of the body tube.


Wiring took a bit longer. Here are some in-progress photos:


The 915 MHz antenna was a fun challenge. Doing some math (same formula I used for my ADS-B 1090 MHz antenna) indicates an ideal length of ~80 mm. This is the vertical green wire you see here:

I also ought to have a ground for it, and the typical approach to that would be another 80 mm wire going up, parallel but opposite the green wire. There wasn’t enough space to do that, so I had to route it around a few components without letting it get too close to the GPS antenna. I considered attaching it to one of the threaded rods to create a massive ground, but I thought there was a chance that would affect performance in unpredictable ways. It would also make assembly annoying. You can see the ground antenna here in black coming off a pad directly next to the green antenna. It routes to the other side of the sled.

